Learn How To Play "And I Love Her" with this Guitar Lesson
If you're a Beatles fan, you know that the iconic band has created some of the most unforgettable tunes in the history of music. One of these tunes is "And I Love Her," a song that has captured the hearts of millions with its beautiful melody and romantic lyrics.
If you're a guitar player, you might have tried playing this tune before, but finding the right chords and techniques to master it can be challenging. That's why I’m here to help!
In this guitar lesson, I'll take you through the steps to master "And I Love Her" on the guitar. From the basic chords to the fingerpicking patterns, I'll break down the song into manageable sections, so you can learn and play it with ease.
So, grab your guitar, tune-up, and let’s get started!
Who wrote And I Love Her?
"And I Love Her" was written by primarily Paul McCartney however it is credited to the Lennon–McCartney partnership. The song is the 5th track of the album A Hard Day’s Night and it was released in 1964.
It was first released as a single and it reached No. 12 on the Billboard charts.
The Beatles only performed this song once outside EMI Studios on July 14th, 1964.
And I Love Her Chords
You will need to become familiar with these 6 chords. F#m7, E6, C#m7, A, B7, and G#m7.
Here is how I would play each shape.
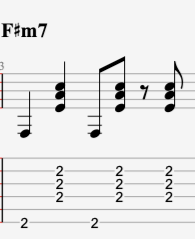
F#m7 I would play as a bar chord at the 2nd fret like this:

E6 is played like a typical E chord however here we are going to add the 2nd fret on the 2nd string like this:

C#m7 is played with a root on the 5th string like this:

A is played in an open position like this:

B7 as well:

And finally, we have a G#m7 which is the same shape as the F#m7 but moved up to the 4th fret like this:

Intro
The song begins with a 4-bar chord progression just using 2 chords. Here’s the progression:
F#m7 (2 bars)
E6 (2 bars)
On top of this progression is a simple guitar lick played on a nylon string guitar that starts on the 2nd fret of the 5th string and goes like this:

This simple little part is iconic and it only uses 4 notes yet is instantly identifiable. This really shows the GENIUS behind the Beatles’ guitar parts. The Beatles crafted memorable guitar riffs and hooks that became signature elements of their songs.
Verse
After the intro the song progresses to the Verse and here is where Paul comes in singing the lyrics:
“I give her all my love…”
Here we’ll alternate from an F#m7 chord to a C#m7 chord three times spending 1 bar on each chord like this:
F#m7 (1 bar)
C#m7 (1 bar)
F#m7 (1 bar)
C#m7 (1 bar)
F#m7 (1 bar)
C#m7 (1 bar)
After this will go to an A for 1 bar, a B7 for 1 bar, and then end with 2 bars of E6 like this:
A (1 bar)
B7 (1 bar)
E6 (2 bars)
So the total phrase is 10 bars long and all together would go like this:
F#m7 (1 bar)
C#m7 (1 bar)
F#m7 (1 bar)
C#m7 (1 bar)
F#m7 (1 bar)
C#m7 (1 bar)
A (1 bar)
B7 (1 bar)
E6 (2 bars)
Strumming and Rhythm:
Once you feel comfortable with the chord progression next try adding some strumming or fingerpicking. Here I share a rhythm pattern for each:
The strumming pattern on the recording uses a combination of eighth-note and quarter-note rhythms. Start with two downstrums on beats 1 and 2. Then play 4 strums using an alternating pattern for beats “3 and 4 and” like this:

D D DUDU
1 + 2 + 3 + 4 +
This is a general groove that you can use throughout the entire song. It is a 1 bar pattern and can be applied to the entire progression and will sound GREAT!
Try to be consistent but remember that it does not have to be exactly the same in every bar. Use this as a general guideline to get the feel for it and then let the song flow from there.
Fingerpicking Patterns:
Since the song has a bit of a Latin feel to it, I often play this pseudo-bossa-nova-style groove like this:
This pattern can be applied to the entire chord progression as well.
Dialing in a Beatles-style electric guitar tone
Next, I’ll share a little bit about how I dialed in the tone for the above video. These are general guidelines using a Fender style amp.
- Start with the Clean Channel: Set your amp to the clean channel. This typically provides a clear and transparent tone.
- Adjust the Gain: Keep the gain or volume knob at a low level to ensure minimal distortion and maintain this clean tone. Aim for a balanced sound without any breakup or overdrive.
- Set the EQ: Begin by setting the bass, mid, and treble knobs at a neutral or "12 o'clock" position, or around 5 on a Fender-style amp. This setting provides a balanced frequency response, allowing your guitar's natural tone to shine through.
- I added a bit of Tremolo: Locate the tremolo effect on your Fender amp. It might be a dedicated knob or switch labeled "Tremolo" or "Vibrato." Turn it on to activate the tremolo effect.
- Adjust the Tremolo Depth: The depth control determines the intensity or strength of the tremolo effect. Start with a conservative setting, around 25-30% of the maximum depth, to achieve a subtle modulation.
- Set the Tremolo Speed: The speed control adjusts the rate at which the tremolo effect oscillates. Experiment with different settings to find the desired speed that suits your playing style and the song's mood.
- Fine-Tune the Tone: Use your ears to make further adjustments based on personal preference. If you want a brighter tone, increase the treble slightly. For a warmer sound, boost the bass. Make subtle tweaks until you're satisfied with the overall tone.
- Experiment and Refine: Spend some time playing and listening to your clean tone with tremolo. Experiment with different picking dynamics, chords, and playing styles to gauge the effect's impact on your sound. Refine the settings as needed to achieve the desired balance between cleanliness and tremolo ambiance.
Remember, these guidelines serve as only a starting point. You may need to tailor them to your specific Fender amp model and personal taste. Enjoy the process of dialing in your clean tone with tremolo for this song and have fun exploring the sonic possibilities you can add to your playing.
Conclusion:
Adding this iconic Beatles song to your repertoire is sure to delight your audiences for years to come. By mastering the chords, riffs, rhythms, and even nailing the tone you are now ready to recreate the magic of "And I Love Her" on your own guitar.
Remember, practice is key. Take your time to internalize each element I mentioned here and don’t forget to also try and play this song along with the recording as well for practice. And for another great Beatles lesson check out “You’ve Got To Hide Your Love Away” next!
Like this blog post? Get Jon’s best guitar lessons straight to your inbox.
Discover the 5 easiest and fastest ways to play the blues scale anywhere on the neck with this FREE PDF GUIDE
