Breathe Pink Floyd Guitar Lesson
Today I want to share with you a song from the 4th best-selling album of all time. In this “Breathe” Pink Floyd guitar lesson we’ll unpack beautiful lush-sounding chords, how to get a David Gilmour type of guitar tone, arpeggio picking, and even some cool fills you can use to add a splash of lead guitar style to your rhythm playing.
So get all tuned up, and let’s get started!
Breathe Guitar Tone
The guitar tone on “Breathe” is a result of several factors. Here are a few pointers worth mentioning.
Guitars: Gilmour often uses Fender Stratocaster guitars, which has become a signature part of his sound. His preferred Stratocaster during the recording of "The Dark Side of the Moon" was a 1969 Black Fender Stratocaster with a maple neck.
Amplifiers: Gilmour's amplifiers were a crucial element of his tone. During this period, he used a Hiwatt DR103 100-watt head and a WEM (Watkins Electric Music) Custom 4x12 speaker cabinet. The Hiwatt's clean and full sound paired well with his Stratocaster, and gave him a solid foundation for building his tones.
Effects: Gilmour made extensive use of effects pedals to craft his unique sound. While the exact combination of pedals for "Breathe" is not definitively known, some of the staple effects he used included:
Uni-Vibe: An effect that simulates the sound of a rotating speaker, creating a swirling modulation that became a staple in Gilmour's sound.
Delay and Reverb: Gilmour employed various delay and reverb effects to create spacious and atmospheric sounds.
It's important to note that Gilmour's guitar tone is not just the result of specific gear but also his creative approach to music and playing. His sense of melody and emotional expression, combined with the equipment and effects he used, helped him achieve the legendary guitar tone heard on "Breathe" and many other Pink Floyd classics.
Breathe Guitar Chords
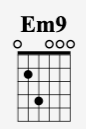
To play “Breathe” you’ll need to know 8 chords total, Em9, A, Cmaj7, Bm7, Fmaj7, G, D7#9, and Ebdim.
Let’s take a look at these chord shapes first.
Em9 is a big open-sounding chord that uses all 6 strings. It’s very close to an open Em chord you just change one note like this:
Next, we’ll play an open position A chord like this:

The main progression of this tune only uses those 2 chords Em9, to A.
Then in the bridge, the following 6 chords are used. First is Cmaj7 like this:

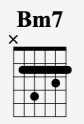
Bm7 is played at the 2nd fret as a bar chord like this:
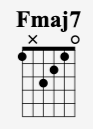
For Fmaj7, I use my fretting hand thumb on the low 6th string. If this is uncomfortable for you just remove the bass note and play from the 4th string down.
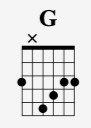
Then I take the same shape and shift it up 2 frets to the 3rd fret. I also bar down and cover the 1st string on the 3rd fret like this:
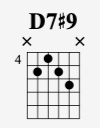
D7#9 (aka the “Jimi Hendrix chord”) is played in the 4tth position like this:
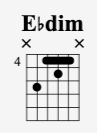
And finally, Ebdim (a chord a lot of lessons don’t play right) is played like this:
Main Progression
The main progression to the song just switches between an Em9 and an A chord.
Each chord last 4 counts, or 1 bar like this:
/ / / /
Em (1 bar)
/ / / /
A (1 bar)
This repeats over and over for the intro after the song’s sound effects fade in. Here Gilmour uses a number of techniques to play through the progression. One of those techniques is a backward rake through the strings (after hitting the bass note) on the Em9 chord like this:

He also uses another technique throughout the song called arpeggio picking. Arpeggio picking (sometimes called arpeggiating) is a technique where you play the notes of a chord individually, rather than strumming them all together. Instead of sounding the entire chord simultaneously, you pluck each note one after the other in a sequence.
Here’s an example of how Gilmour might arpeggio pick on the A chord like this:
 When Gilmour moves up to the 3rd fret on the 2nd string, he is expanding on the basic A chord and creating an Asus4 chord like this:
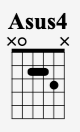
Typically sus4 chords resolve back to just the basic triad in most songs. That’s exactly what happens at the end of the measure. This helps to create a little melody in the guitar part. It also makes the music feel like it is moving forward (even though the progression is just staying on the A chord).
Both bars together in this style would go like this:

Here are 3 steps to get started with Gilmour-style arpeggio picking:
- Form an Em9 or an A Chord: First, simply hold down the chord shape.
- Pick the Notes: Once you have the chord shape fretted, start picking individual notes of the chord one by one. You can start from the lowest note (the bass note) and move upwards, or you can start from the highest note and move downward.
- Order and Timing: Arpeggios can be played in various orders, such as ascending (lowest to highest), descending (highest to lowest), or in a specific pattern. The timing of the picking can also vary depending on the desired feel and tempo of the music.
Experiment with these two chords in this progression to explore this style more.
Once Gilmour comes in singing the lyrics, “Breathe, breathe in the air…”
The main progression is repeated 4 times like this:
Em (1 bar)
A (1 bar)
4x
After those 4 times then we move on to the…
Bridge Progression
The bridge progression is only 4 bars long but it has an amazing chord progression to it.
For the first 3 bars, each chord lasts 4 counts, or a bar each.
Cmaj7 (1 bar)
Bm7 (1 bar)
Fmaj7 (1 bar)
Then in the final bar, we’ll play 2 beats on G. Then one beat on D7#9, and one beat on Ebdim.
/ / / /
G D7#9 Ebdim
Conclusion:
“Breathe" by Pink Floyd stands as a timeless classic, and learning to play this iconic song can be a rewarding experience for any guitarist. By unlocking those lush-sounding chords, studying the distinctive David Gilmour guitar tone, mastering the art of arpeggio picking, and adding some tasteful fills, you can capture the essence of the song's emotive and atmospheric vibe.
Remember to work it out one piece at a time, and when you’re ready try to play it along with the recording. And for another great Pink Floyd-style lesson check out how to play “Money” next!
Like this blog post? Get Jon’s best guitar lessons straight to your inbox.
Discover the 5 easiest and fastest ways to play the blues scale anywhere on the neck with this FREE PDF GUIDE
