Get Your Blues Groove On with this "Got My Mojo Working" Guitar Lesson
Looking to expand your blues repertoire and improve your timing and groove?
This ultimate guide to how to play “Got My Mojo Working” on guitar has got you covered.
In this guitar lesson, I’ll share with you how to play the signature blues groove, rhythms, turnarounds, and even talk soloing for this classic blues tune. It follows a typical 12-bar blues progression, and if you practice the tips shown here, you’ll have your audience tapping their feet and swaying to the beat in no time!
Who originally sang Got My Mojo Working?
"Got My Mojo Working" was written by Preston "Red" Foster, and it was first recorded in 1956 by R&B singer Ann Cole. This version has a great upbeat groove to it. The lyrics of the song describe something called mojo, which has been associated with hoodoo, an African-American folk magic tradition.
Later in 1957, Muddy Waters put his own spin on the arrangement and changed the lyrics just slightly. His most famous version of the song was actually recorded live in 1960 and this version received several awards from various publications and organizations.
At this point, it is now a blues standard and is a great one to add to your repertoire for blues jams and playing with other musicians.
Got My Mojo Working Chords
You’ll only need 3 chords to play “Got My Mojo Working” E7, A7, and B7. These 3 chords are the primary chords in a blues in the key of E. Notice the use of all dominant 7th chords.
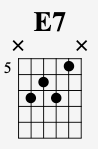
Here is how I would play these shapes. For E7 I would use this shape that looks like a C chord but up in the 5th position like this:
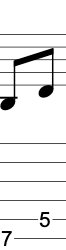
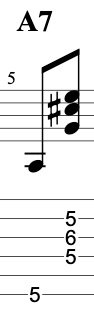
For A7 I would play a 4-note chord at the 5th position as well like this:

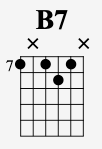
And lastly for the B7 just take the previous chord up 2 frets and play this:
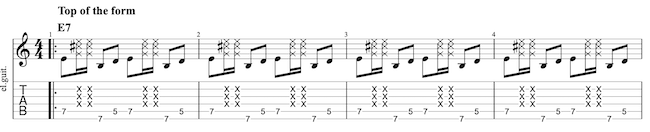
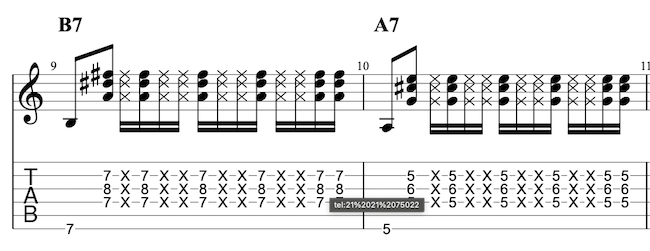
The "Got My Mojo Working" Signature Groove
The underlying groove of this is a 16th-note feel. This is essentially thinking of each beat being broken into 4 parts. For this groove, I like to count:
1 e + a 2 e + a etc.
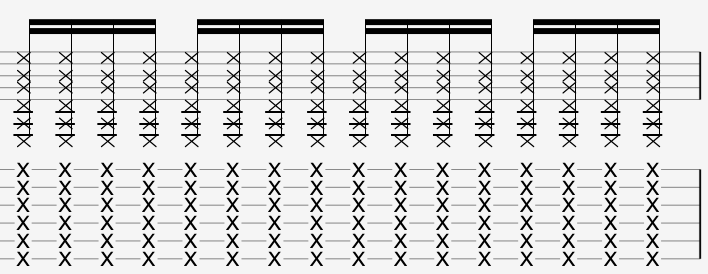
A great exercise is just to play along with the actual song and use a 16th-note down-up strumming pattern all played on muted strings like this:
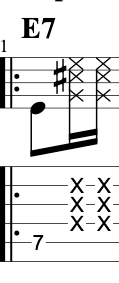
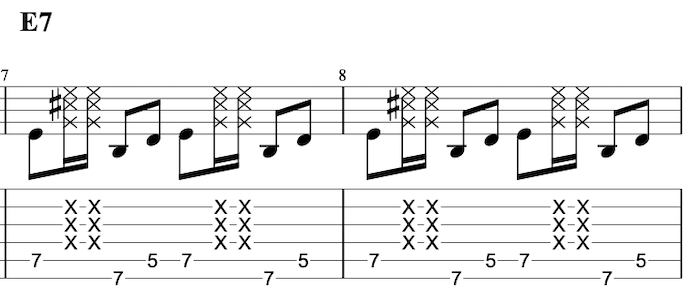
From there start to add in the signature riff and mix that with the groove. First, play the 7th fret on the 5th string and then a down-up on 2 muted scratch strums like this:
Then play the 7th fret on the 6th string and fret 5 on the 5th string like this:
This is a simple but effective 2-beat groove, and it can be repeated over and over for the first 4 bars of the progression like this:
This is all based around the E7 chord shape from above and combines just a simple pentatonic bass line into the riff.
Tip: When I play the single notes in the riff I actually strum the strings and use fret hand muting to mute off the adjacent strings. This produces a “thud-like” sound to the rhythm as I strum. (See the video above for more details.)
After 4 bars of this riff, I’ll then move to the A7 chord for 2 bars. Here I start on the downbeat playing just the root note on the 6th string 5th fret, and then on the “and” of 1, I’ll strum the remaining strings. Breaking up the bass strings from the treble strings adds a great two-dimensional sound to your rhythm playing.
In beat 2, I’ll start with a down strum on a muted strum and then an upstrum fretting down the chord. Then after that, I’ll play another down-up but this will just be on muted strings. Again remember the groove from above when we played a 16th-note rhythm purely on muted strings? Here the idea is that we have that groove as the foundation but now we are bringing in accents of the chord actually being fretted down as well. This style of playing is what really gets your audience on the dance floor.

In beat 3 we’ll hit the first and last 16th-notes fretting the chord down while playing the middle 16th-notes as scratch strums like this:

Then in the last beat, we’ll play 2 scratch strums and then 2 strums fretting down the chord. Remember all throughout the strum-hand keeps a consistent down-up pattern.

From here we’ll return back to 2 more bars of the riff that we played for the first 4 bars representing the E7 chord like this:
Now you have the first 8 bars of the groove try putting them all together like this:

Now we're at the last 4 bars of this blues groove. Here we are going to bring in the B7 chord at the 7th fret. We’ll play the same groove that we did on the A7 chord but apply it to the B7. Here we’ll play B7 for one bar, and then move the chord shape down 2 frets and play the same pattern on A7 like this:
The Turnaround Lick
In the last two bars of the blues often times guitarist will use a turnaround lick. This is a short melody that gets the band from the end of the 12-bar blues back to the top. Remember that in 12-bar blues songs often the entire time you’ll just play the same progression over and over.
This turnaround lick starts with a low 6th string open and then slides into the 4th fret on the 3rd and 1st strings. This again is strummed just like the riff we used above. So in order to get this to sound right you’ll want to mute off the 2nd string which is in between these two strings using fret-hand muting. From there the lick walks down from the 4th fret every fret until you resolve on an E triad using the top 3 strings at the downbeat of the final measure.
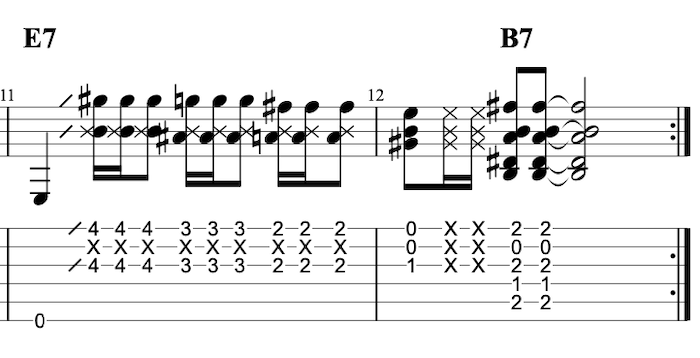
After this lick the chord progression is turnaround around with one last B7 chord this time played in the 1st position. This makes it much smoother than having to jump back up to the 7th position B7 chord used above.
Scales For Soloing
Once you've mastered the "Got My Mojo Working" riff and you’re feeling comfortable with your 12-bar blues rhythm, it's time to start adding your own personal touch and improvising with the music. One way to do this is to experiment with different melodies using the blues scale.
The master scale for this sound would be the E minor blues scale which can be played at the 12th fret like this:

Try experimenting with different notes and rhythms to create your own variations and solos. Here are a few ideas to experiment with:
- Try adding in some slides, bends, or vibrato to give the notes more character.
- Try experimenting with dynamics. Play around with the volume and intensity of your playing to create a more dynamic and expressive performance.
- Try adding in string bending. This is a crucial sound in blues lead guitar.
Remember, the key to adding your own style and improvisation is to practice and experiment until you find what works best for you.
Conclusion
Once you've gone through these steps you should have a good idea of the progressions, riffs, and grooves to play in this style. Next, you’ll want to try to put it all together and jam with the song or with others. Remember to have fun and let your creativity flow, and for another great blues jam try “Green Onions” next!
Like this blog post? Get Jon’s best guitar lessons straight to your inbox.
Discover the 5 easiest and fastest ways to play the blues scale anywhere on the neck with this FREE PDF GUIDE
