Step-by-Step Guitar Lesson On Suzie Q: Beginner to Advanced
Are you looking to improve your rock and blues guitar skills?
If so, this step-by-step “Suzie Q” guitar lesson is your ticket!
In this post, I’ll share with you the history of the song, the chords, the iconic riff, and everything else you need to know to get playing in the style today!
Who Originally Sang Suzie Q?
The original version of "Suzie Q" was sung by American rock singer-songwriter Dale Hawkins. Hawkins was often credited as the architect of swamp rock boogie. He wrote the tune during a booming rockabilly era with fellow bandmate Robert Chaisson, and they recorded it in 1957. Hawkins's version featured the brilliant guitar work of James Burton, who worked with many famous artists such as Elvis Presley and Ricky Nelson among others.
What key is Suzie Q in?
“Suzie Q” is in the key of E and features a blues riff and chord progression. The original version by Hawkins and the later version recorded by Creedence Clearwater Revival (CCR) are both in the key of E and follow the same progression. The CCR version is a little bit grittier and swampier. The guitar tones have more bite to them, as well as a raspier vocal style from John Fogerty.
Susie Q Chords
One of the first steps you’ll want to do to play the song is to learn the chords. There are only four you need to know, E7, A, C, and B.
For E7 play this:

For the A I’ll use just my index finger and bar at the 2nd fret like this:

C I’ll play as a bar chord on the 3rd fret like this:

And finally, for B I’ll just shift that C bar chord down one fret like this:

Next, you’ll want to plug those chord shapes into the chord progression. The entire song is just one looping 8-bar progression. I would consider this an 8-bar blues.
E7 (4 bars)
A (1 bar)
C, B (1 bar)
E7 (2 bars)
To get familiar with the progression, I would recommend strumming just quarter notes, which means four strums per bar on each chord. Count out loud as you go 1, 2, 3, 4. Tip: take note of the use of two chords in bar 6 when you change from C to B. This is essentially the turnaround progression of this 8-bar blues.
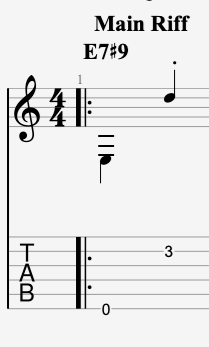
How To Play The Signature Susie Q Riff On Guitar?
Once you have mastered basic chord progression and strumming patterns, it's time to take things up a notch and add in some riffs. The main riff to “Suzie Q” is all based on the E minor pentatonic scale in the open position.
This scale pattern is great for coming up with cool riffs for a number of reasons.
- You can use all the open strings of your guitar
- You conveniently play common open-position chords and mix in riffs without having to jump across the fretboard
- You can add in low pedal tone bass notes to sound like multiple guitar players
The E minor pentatonic scale can be played in the open position like this:
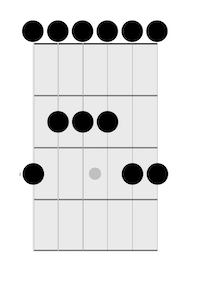
To play these notes on your guitar start with the open 6th string and play:
6th string frets = 0, 3
5th string frets = 0, 2
4th string frets = 0, 2
3rd string frets = 0, 2
2nd string frets = 0, 3
1st string frets = 0, 3
This scale is very similar to the blues scale which you can check out here!
Next, you can try playing riffs using these notes as an available pool of notes to choose from.
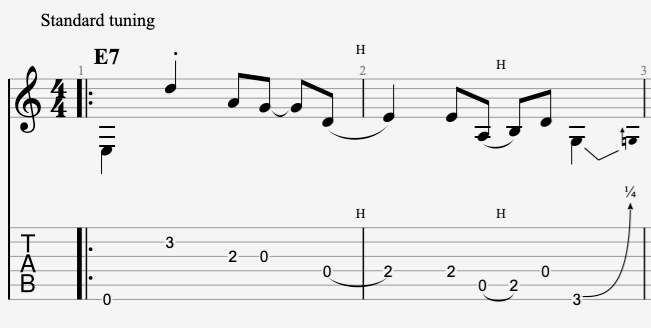
Example 1 begins by plucking the open 6th string and then jumps up to the 3rd fret on the 2nd string. This is the root and 7th of the E7 chord we learned from the chord progression above. Immediately just hitting those two notes gives you a bluesy sound.
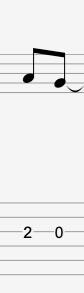
Then play the 2nd fret on the 3rd string and then open.
From there will bring in a hammer-on from the open 4th string to the 2nd fret.

Then play the 2nd fret of the 4th string and another hammer-on from the open 5th string to the 2nd fret. And we’ll finish it all off with open 4th string and a slight bend on the 3rd fret of the 6th string.
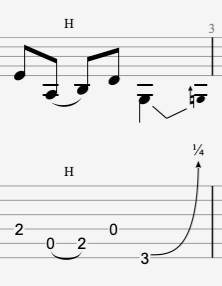
The slight bend is called a blue note and the idea is to actually pull the note slightly out of tune.
Once you feel comfortable with those previous examples try to string them all together like this:
This part is for those who like a challenge
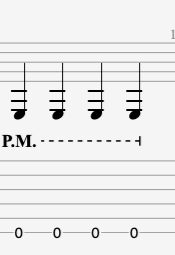
This next part is where things get a bit tricky. However, if you master it, you can sound like two guitar players at once! The way I like to play in this style is by adding a pedal-tone bass part while playing the riff on top. The goal is to keep a consistent quarter-note bass line on the low 6th string.
I typically rest my fingerpicking hand on the bass strings and palm-mute the low notes. This technique reduces the bass part's volume and ring, preventing it from overpowering the melody on top.
You want to tuck the bass line right underneath the melody, just like a backing band that supports the singer."
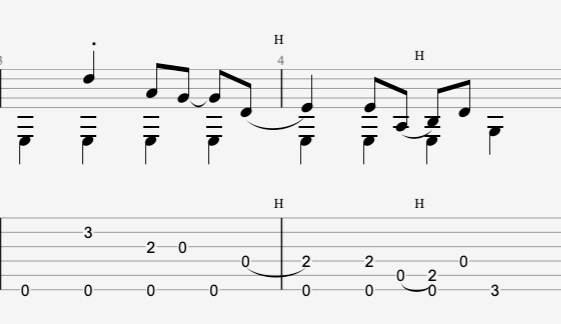
This requires a lot of thumb independence so I recommend just playing both the bass part and the melody part individually many times, and then slowly putting them together like this:
Put it All Together and Play Along with the Song
At this point, we have covered chords, progressions, scales, riffs, and even how to sound like two guitar players at once. Your next step is to take the riff and drop it into the chord progression wherever there is an E7 chord. Remember that this is in the key of E, and we use the riff to function essentially as the E7 chord in the progression.
In conclusion, learning to play "Suzie Q" as recorded by CCR or Dale Hawkins is a fantastic way to improve your blues and rock guitar skills. Adding this classic to your repertoire will give you hours of enjoyment for years to come. While the song may seem intimidating at first, with the practice of the right skills - like what I teach in my programs - you can master this song and make your audience watch in awe. If you enjoyed this lesson check out “Call Me The Breeze” next for more bluesy progressions!
Like this blog post? Get Jon’s best guitar lessons straight to your inbox.
Discover the 5 easiest and fastest ways to play the blues scale anywhere on the neck with this FREE PDF GUIDE
