5 Beginner Fingerpicking Blues Licks
When it comes to playing fingerstyle blues guitar or just fingerstyle guitar in general, one of the most important areas to develop is the fingerpicking hand thumb. You want to focus on independence with this finger. The more a player develops this the more full sounding they are able to play. It takes time, but step-by-step is the best way to put this together.
In this post, I want to share with you 5 beginner fingerpicking blues licks. Each lick can be practiced like a fingerpicking exercise and will help you develop this exact type of thumb independence.
This style has been used in the blues by many great players like John Lee Hooker and Hubert Sumlin, to even rock n roll musicians like John Fogerty with CCR. Have a listen to tunes like Suzie Q. or Green River to hear this style in rock as well.
Playing this pedal tone blues style is a captivating technique that adds depth and character to your blues playing. By maintaining a steady bass note (pedal tone) while incorporating melodic lines on top, you create a unique and mesmerizing sound. This approach allows you to explore dynamic rhythms, create tension and release, and play riffs while holding down a rhythm.
If this is new to you it can feel a bit like juggling. Breaking down each part independently first is a great idea, then as they feel comfortable try to put them together.
Scales
The primary scale that I am using for these licks is the E minor blues scale. These licks are going to be in the key of E. The E minor blues scale can be played in open position like this:
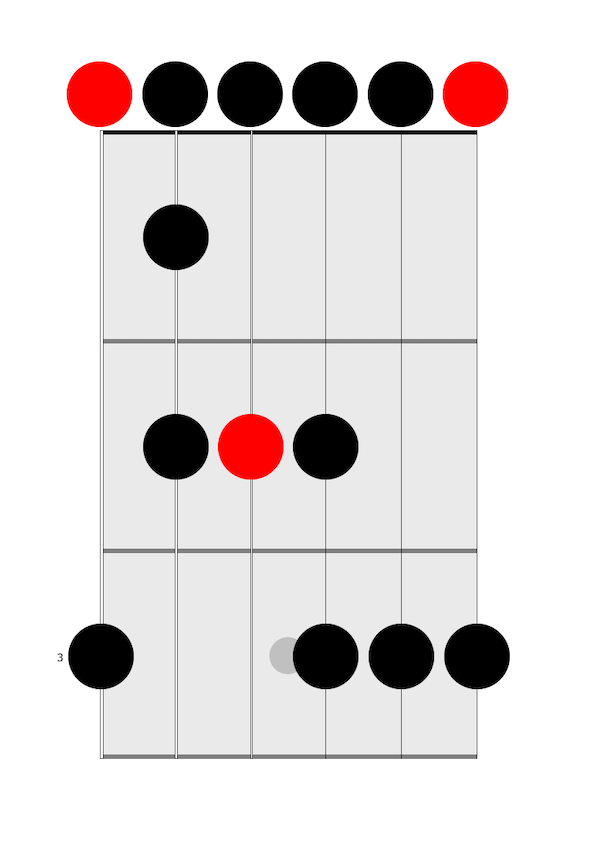
Those same strings and frets can be viewed like this as well:
6th string = 0, 3
5th string = 0, 1, 2
4th string = 0, 2
3rd string = 0, 2, 3
2nd string = 0, 3
1st string = 0, 3
These licks are all going to be in the key of E and primarily use notes from this scale. Later I will show you the exceptions but in general, this is the master scale.
So with that said, let’s get into the licks!
Lick #1
Lick #1 takes place on just the top 2 strings. It begins on the “and” of 1 at the 3rd fret of the 1st string. We’ll use an eighth-note rhythm and descend down the scale to the 3rd fret of the 2nd string, and then end with the open E string played twice.

As I mentioned above a great way to learn these types of licks is to separate the bass part from the melody.
The bass is played with the thumb of the fingerpicking hand. I’ll also typically palm-mute the bass just slightly so it doesn’t overpower the melody on top.
Start by just playing the bass part and counting out loud 1, 2, 3, 4 while also tapping your foot. Tip: I always tap the foot opposite of my fingerpicking hand.

Then practice the melody just by itself as well. When I play the melody I count out eighth notes like this:

This helps me identify where the thumb and melody fingers line up, and also where the melody notes fall in the crack between the bass notes.
Then once each part feels comfortable SLOWLY put them together like this:

Lick #2
The second lick follows a similar idea however this time we will skip down at the end of the phrase. So we’ll start off exactly the same as lick 1, but this time we’ll take the last note and instead of it being the open 1st string, we’ll skip down to the open 3rd string and let that ring out until the end of the measure.

Again the bass stays steady and is played strictly with the thumb of the fingerpicking hand.

The melody on top uses more notes from the E blues scale. It starts on the “and” of 1 just like Lick #1, but this time has a different ending.

Practice these parts individually and once you feel comfortable SLOWLY put them together like this:

Lick #3
Lick #3 is slightly longer. This lick lasts 2 bars. It starts again the same way as lick #1 but has another variation on the ending bringing in the 2nd fret on the 3rd string, as well as the open 3rd string.

As with the previous two licks, we’ll keep a steady bass part played on the low E string. Remember to use a bit of palm-muting to take a little ring out of the note.

The melody on top here is still using notes from the E blues scale. It starts on the “and” of 1 as well and goes like this:

Remember to take your time with each part, and then only once you feel comfortable SLOWLY put them together like this:

Lick #4
In Lick #4 we branch off a bit from the E minor blues scale. This lick goes over a B7 chord the V chord in the key of E. The top-line melody starts on the 2nd fret of the 1st string. This note is F# which is a chord tone of the B7 chord. The lick walks down in ½ steps from this F# and then finishes with 2 two notes from the E minor blues scale like this:

As with all these licks, I keep stressing the steady bass note practice. Here the bass note has moved to the 5th string 2nd fret. This is the note B which is the root note of the B7 chord the V chord in an E blues. It is still played by the thumb of the fingerpicking hand, here with just shift strings to the 5th string like this:

The melody on top starts on the F# note and walks down chromatically. Notice the use of the slight bluesy bend on the 3rd fret of the 2nd string. This is a common blues inflection and here I use the pinky finger of my fretting hand for the bend.

Next, try to put them together like this:

Lick #5
And for our final lick, this one is going to go over the IV chord or the A chord in a blues in the key of E.

Again the bass stays steady however this time it is played on the open 5th string. This is the note A and is the root note. Think of your fingerpicking hand thumb as a bass player. The bass player plays the roots or bass notes of each chord and follows the changes. That is exactly what is happening in each lick here.

The melody for this lick reaches up to the 5th fret on the 1st string. This is a common melodic move used in countless fingerstyle blues songs. The melody walks down on the 1st string like this:

Next, try to put them together like this:

Conclusion
Working on these licks will help you not only explore new techniques but also develop your rhythm and time. Again I really want to take a moment to highlight the significance of training your fingerpicking hand thumb. It’s one of the most important areas to focus on to improve your fingerstyle playing.
In fingerstyle blues, the thumb plays a crucial role in providing a solid rhythmic foundation and creating a distinct bassline. It sets the groove and adds depth to your playing. To develop this in your playing practice all the above licks, and dedicate time to strengthening and training your thumb.
Focus on developing control, accuracy, and strength. The more you train your thumb, the more versatile and expressive your fingerstyle blues playing will become. Also the EASIER it gets.
Remember, fingerpicking is a skill that requires patience and practice. Be persistent and dedicated in your training, gradually increasing the complexity of your licks and incorporating your newfound thumb control. Over time, you will see your fingerstyle blues playing really evolve.
Now it's up to you! Take the licks and techniques you've learned and make them your own. Experiment, improvise, and add your own personality to your fingerstyle blues playing.
Happy playing and for another great fingerstyle blues lesson check out “Boogie Chillen” next!
Like this blog post? Get Jon’s best guitar lessons straight to your inbox.
Discover the 5 easiest and fastest ways to play the blues scale anywhere on the neck with this FREE PDF GUIDE
